Most of the time the Lock Screen is just an unnecessary obstruction which doesn’t let the user sign-in directly. Also, users complain that sometimes they are not able to enter the right password because of this Lock Screen feature. It would be better to disable the Lock Screen feature in Windows 10 from Settings which would rapidly increase the sign-in process. But again there is no such option or feature for disabling the lock screen. Even though Microsoft hasn’t provided a built option to disable the lock screen, but they can’t stop users from disabling it with the help of various hacks. And today we are going to exactly discuss these various tips & tricks which will help you in this task. So without wasting any time let’s see How to Disable the Lock Screen in Windows 10 with the help of the below-listed guide.
Disable the Lock Screen in Windows 10 [GUIDE]
Make sure to create a restore point just in case something goes wrong.
Disable the Lock Screen in Windows 10 [GUIDE] Method 1: Disable the Lock Screen Using Group Policy Editor Method 2: Disable the Lock Screen Using Registry Editor Method 3: Disable the Lock Screen Using Task Scheduler Method 4: Enable Automatic Login On Windows 10
Method 1: Disable the Lock Screen Using Group Policy Editor
Note: This method will not work for users who have Home Edition of Windows; this only works for Windows Pro Edition.
Press Windows Key + R then type gpedit.msc and hit Enter to open Group Policy Editor.
Now navigate to the following path in gpedit in the left window pane: Computer Configuration > Administrative Templates > Control Panel > Personalization
Once you have reached Personalization, double-click on “Do not display the lock screen” setting from the right window pane.
To disable the lock screen, checkmark the box labelled as Enabled.
Click Apply, followed by OK.
This would Disable the Lock Screen in Windows 10 for Pro Edition users, to see how to do this in Windows Home Edition follow the next method.
Method 2: Disable the Lock Screen Using Registry Editor
Note: After Windows 10 Anniversary Update this method doesn’t seem to work anymore, but you can go ahead & try. If it didn’t work for you, then go to the next method.
Press Windows Key + R then type regedit and hit Enter to open Registry Editor.
Navigate to the following Registry key: HKEY_LOCAL_MACHINE\SOFTWARE\Policies\Microsoft\Windows\Personalization
If you can’t find Personalization key then right-click on Windows and select New > Key.
Name this key as Personalization and then continue.
Now right-click on Personalization and select New > DWORD (32-bit) value.
Name this new DWORD as NoLockScreen and double click on it to change its value.
In the Value data field, make sure to enter 1 and click OK.
Reboot your PC to save changes, and you shouldn’t see the Windows Lock Screen anymore.
Method 3: Disable the Lock Screen Using Task Scheduler
Note: This method only disable the lock screen in Windows 10 when you lock your PC, this means when you boot up your PC, you would still see the lock screen.
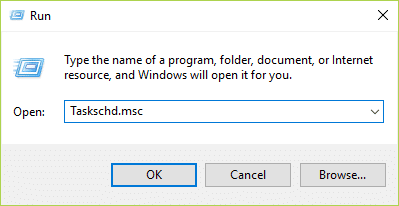
Press Windows Key + R then type Taskschd.msc and hit Enter to open Task Scheduler.
Then, from the Actions section from the far right, click Create Task.
Now make sure to name the Task as Disable Windows Lock Screen.
Next, make sure “Run with highest privileges” option is checked in the bottom.
From “Configure for” drop-down select Windows 10.
Switch to Triggers tab and click on New.
From the Begin the task drop-down select “At log on.”
That’s it, don’t change anything else and click OK to add this specific trigger.
Again click New from triggers tab and the Begin the task dropdown select “on workstation unlock for any user” and click OK to add this trigger.
Now move to the Action tab and click on the new button.
Keep “Start a program” under Action dropdown as it is and under Program/Script add “reg.”
Under Add arguments field add the following: add HKLM\SOFTWARE\Microsoft\Windows\CurrentVersion\Authentication\LogonUI\SessionData /t REG_DWORD /v AllowLockScreen /d 0 /f
Click OK to save this new Action.
Now save this Task and reboot your PC to save changes. This would successfully Disable the Lock Screen in Windows 10 but to Automatically login on Windows 10 follow the next method.
Method 4: Enable Automatic Login On Windows 10
Note: This will bypass the Lock screen and Sign-in screen both and it won’t even ask for the password as it will automatically enter it and log you on your PC. So it has a potential risk, make sure only to use this if you have your PC somewhere safe and secure. Otherwise, others may be able to access your system easily.
Press Windows Key + R then type netplwiz and hit Enter.
Select the user account you want to automatically sign in with, uncheck the “Users must enter a user name and password to use this computer” option.
Click Apply, followed by OK.
Enter your administrator account password and click OK.
Reboot your PC you will automatically sign in to Windows. Recommended:
Fix ERR_QUIC_PROTOCOL_ERROR in Chrome Fix Hmm, we can’t reach this page error in Microsoft Edge How To Fix ERR_NETWORK_CHANGED in Chrome Fix ERR_INTERNET_DISCONNECTED in Chrome
That’s it you have successfully Disable the Lock Screen in Windows 10 but if you still have any questions regarding this post feel free to ask them in the comment’s section.


